Collisions and Gravity
Learn how to simulate realistic wall collisions and apply gravity using vector-based physics in SplashKit. This guide explores key principles such as collision detection, response, and gravity simulation, while leveraging SplashKit's intuitive vector functions for 2D game mechanics.
Written by: Shaun Ratcliff
Last updated: 08 Dec 24
Full C# and Python code for this tutorial is still in development.
Introduction to Collisions and Gravity
Section titled “Introduction to Collisions and Gravity”In 2D game development, understanding collisions and gravity is important for creating realistic interactions between objects, whether it’s a character jumping, objects bouncing off one another, or objects colliding in complex environments. These physics elements are the backbone of dynamic gameplay, making games more engaging and interactive. By mastering collisions, you’ll understand how objects respond when they come into contact, while implementing gravity ensures that objects behave naturally, adding a sense of weight and realism to your game world. Beyond gaming, these principles are essential in fields like simulations, robotics, and any system requiring object interaction modeling.
In this tutorial, you’ll learn how to implement these concepts using SplashKit, leveraging vector math for precise collision detection and response. We will continue to look at handling elastic collisions, wall interactions, and gravity simulations, developing your program to manage object movement and physical interactions in your games. By the end, you should have a more robust understanding of 2D game physics, which you can apply to more advanced game mechanics and real-world physics simulations.

SplashKit Vector Functions Used in This Tutorial
Section titled “SplashKit Vector Functions Used in This Tutorial”- Vector Point To Point
- Vector Magnitude
- Unit Vector
- Vector Normal
- Vector Multiply
- Vector Subtract
- Vector Add
- Dot Product
Finding the Closest Point on a Wall for Collision Detection
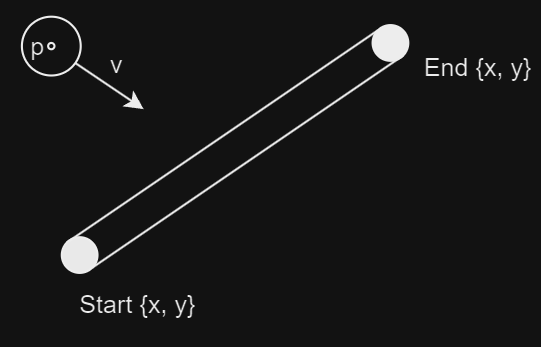
Section titled “Finding the Closest Point on a Wall for Collision Detection”When detecting collisions between a ball and a wall in a 2D game, we need to determine whether the ball has collided with the wall. While we’ve used the radii to represent the sizes of the objects, for collision detection purposes, we treat them as points to simplify the calculations.

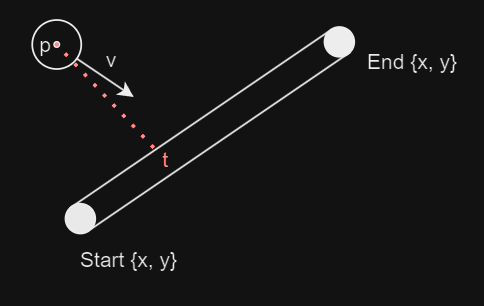
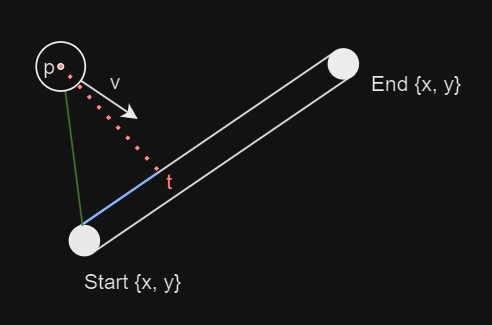
The goal is to find the point along the wall, referred to as t, that is closest to the centre of the ball (point p). The closest point forms a right angle with the ball’s centre.

In these scenarios, calculating this point directly using world coordinates can be complex, so we use normalised coordinates instead. By parameterising the wall, we define its start point as 0 and its end point as 1. This allows us to determine where along the wall the closest point is located, represented by the parameter t.
Calculating the Dot Product for the Closest Point
Section titled “Calculating the Dot Product for the Closest Point”We begin by creating a vector (the green line) from the centre of the ball to the start of the wall. The distance between the closest point and the start of the wall can be calculated using the dot product between this green vector and the vector representing the wall.

// Vector from the start of the wall to the ball's centrevector_2d vector_to_point = vector_point_to_point(start, point);
// Vector representing the direction and length of the wallvector_2d line_vector = vector_point_to_point(start, end);
// Calculate the dot product between the two vectorsdouble dot_product_result = dot_product(vector_to_point, line_vector);
Normalising the Wall and Calculating the Parameter t
Section titled “Normalising the Wall and Calculating the Parameter t”Next, we normalise the wall length by squaring its distance and calculate the parameter t, which determines how far along the wall the closest point is.
// Square of the wall's length for normalisationdouble line_length_squared = line_vector.x * line_vector.x + line_vector.y * line_vector.y;
// Calculate the normalised parameter 't' for the closest point along the walldouble t = dot_product_result / line_length_squared;
Clamping t to Constrain the Closest Point Within Wall Bounds
Section titled “Clamping t to Constrain the Closest Point Within Wall Bounds”A final step is needed to ensure the closest point remains within the wall’s bounds. Since the vector created from the start and end points of the wall can theoretically extend in both directions infinitely, we need to clamp the value of t between 0 and 1. If the ball is positioned outside the wall’s boundaries, the closest point will either be at the start (t = 0) or the end (t = 1).
// Clamp 't' to ensure the closest point remains within the wall's boundst = fmax(0, fmin(1, t));
// Return the coordinates of the closest point on the wallreturn {start.x + line_vector.x * t, start.y + line_vector.y * t};
By following this method, we can accurately determine the point on a wall that is closest to a ball, making it easier to detect and resolve collisions in this environment.
Detecting Ball and Wall Overlap
Section titled “Detecting Ball and Wall Overlap”When determining if a ball has collided with a wall, we need to calculate the distance between the ball’s centre and the closest point on the wall. The aim is to check if the distance between the ball’s centre and the wall is less than or equal to the sum of their radii. If so, a collision is detected. We can work this out procedurally:
Calculate the Closest Point on the Wall
Section titled “Calculate the Closest Point on the Wall”We first use a closest_point_on_line helper function (defined above) to find the closest point on the wall’s line segment to the centre of the ball. This is important because it tells us where along the wall the ball is closest to.
// b = ball// w = wallpoint_2d closest = closest_point_on_line(b.ball_circle.centre, w.start_anchor.centre, w.end_anchor.centre);Compute the Distance Between the Ball’s Center and the Closest Point
Section titled “Compute the Distance Between the Ball’s Center and the Closest Point”Once we have the closest point, we can calculate the distance between this point and the centre of the ball. This is done by subtracting the x and y coordinates of the ball’s centre from those of the closest point.
double dx = b.ball_circle.centre.x - closest.x;double dy = b.ball_circle.centre.y - closest.y;double distance_squared = dx * dx + dy * dy; // Using squared distance to avoid unnecessary square root calculationsCheck for Overlap Using Radii
Section titled “Check for Overlap Using Radii”To check for a collision, we need to compare the distance between the ball’s centre and the closest point on the wall with the sum of their radii (i.e., the ball’s radius and the wall’s radius). If the squared distance is less than or equal to the squared sum of their radii, then the ball is overlapping with the wall.
double radius_sum = b.ball_circle.radius + w.radius; // The combined radius of the ball and the wall's thicknessreturn distance_squared <= radius_sum * radius_sum; // True if overlappingThis method works by treating the problem as a basic geometric distance check. It first finds the closest point on the wall to the ball, and then checks if the distance between that point and the ball’s centre is within the radius of the ball plus the wall’s thickness. By squaring both sides, we avoid the computational overhead of calculating the square root, making the code more efficient.
Resolving Ball and Wall Collision
Section titled “Resolving Ball and Wall Collision”Once a collision between a ball and a wall is detected, the next step is to resolve it. This process involves adjusting the position of the ball to prevent further penetration into the wall and modifying the ball’s velocity to simulate a realistic collision response, including bounce and energy loss.
Find the Closest Point on the Wall
Section titled “Find the Closest Point on the Wall”Similar to before, the first step in resolving a collision is to find the closest point on the wall’s line segment to the ball’s centre. This is the point where the ball is essentially colliding with the wall.
point_2d closest = closest_point_on_line(b.ball_circle.centre, w.start_anchor.centre, w.end_anchor.centre);Calculate the Collision Normal Vector
Section titled “Calculate the Collision Normal Vector”After finding the closest point, we calculate the direction from that point on the wall to the ball’s centre. This direction is called the collision normal and is represented as a unit vector (a vector with a length of 1). It indicates the direction in which the ball should be pushed to resolve the collision.
vector_2d collision_normal = vector_point_to_point(closest, b.ball_circle.centre);collision_normal = unit_vector(collision_normal);Determine the Penetration Depth
Section titled “Determine the Penetration Depth”The penetration depth is how far the ball has moved into the wall. It’s calculated by finding the distance between the ball’s centre and the closest point on the wall and comparing it to the combined radii of the ball and the wall (the ball’s radius and the wall’s thickness). The difference between these two values gives us the penetration depth.
double dx = b.ball_circle.center.x - closest.x;double dy = b.ball_circle.center.y - closest.y;double distance = sqrt(dx * dx + dy * dy); // The actual distance between the ball's center and the closest pointdouble penetration = (b.ball_circle.radius + w.radius) - distance;Push the Ball Out of the Wall
Section titled “Push the Ball Out of the Wall”If the penetration is greater than 0, meaning the ball has overlapped with the wall, the next step is to push the ball out. This is done by moving the ball in the direction of the collision normal by the penetration amount.
if (penetration > 0){ b.ball_circle.center.x += collision_normal.x * penetration; b.ball_circle.center.y += collision_normal.y * penetration;}Reflect and Dampen the Velocity
Section titled “Reflect and Dampen the Velocity”After adjusting the ball’s position, we update the ball’s velocity to simulate the bounce. This is done by splitting the velocity into two components:
- Normal Component: The part of the velocity directed along the collision normal.
- Tangent Component: The part of the velocity directed tangentially to the collision.
The normal component of the velocity is reversed and dampened to simulate the loss of energy during the bounce. The tangent component remains unchanged, which allows the ball to retain some of its original motion parallel to the wall.
double velocity_dot_normal = dot_product(b.velocity, collision_normal);vector_2d velocity_normal = vector_multiply(collision_normal, velocity_dot_normal);vector_2d velocity_tangent = vector_subtract(b.velocity, velocity_normal);
// Reverse and dampen the normal component of the velocity// Damping factor is arbitrarily chosen as 0.6b.velocity = vector_subtract(velocity_tangent, vector_multiply(velocity_normal, 0.6));
The ball’s position is adjusted to ensure it no longer overlaps with the wall, and its velocity is updated to reflect the bounce. The damping factor reduces the ball’s speed after the collision, simulating energy loss, so the ball doesn’t bounce indefinitely.
This approach works by:
- Ensuring the ball is pushed out of the wall when a collision occurs.
- Reversing the velocity in the direction of the collision normal to simulate the bounce.
- Reducing the ball’s velocity slightly to simulate energy loss, which prevents the ball from gaining infinite energy through collisions.
Introducing Gravity to the Environment
Section titled “Introducing Gravity to the Environment”In a 2D game or physics simulation, gravity is an essential force that simulates the natural pull of objects towards the ground. By applying a constant downward acceleration, we can create realistic motion where objects fall, speed up as they descend, and eventually reach a terminal velocity due to air resistance or other forces.
In the context of our simulation, gravity is applied to the balls to make them fall towards the bottom of the screen, and this effect is controlled by the update_balls function.
Gravity is treated as a constant force that affects the vertical velocity of the ball. In our simulation, gravity is applied as a constant downward acceleration in the y direction. This acceleration is added to the ball’s current velocity, causing the ball to speed up as it falls.
const double gravity = 0.3;  // Constant downward acceleration due to gravity
for (ball &b : balls){    // Apply gravity to the ball's acceleration (downward)    b.acceleration.y = gravity;}
After applying gravity to the ball’s acceleration, the next step is to update its velocity. The new velocity is calculated by adding the acceleration to the current velocity. Then, the ball’s position is updated based on its new velocity, causing it to move downward.
// Update velocity based on accelerationb.velocity = vector_add(b.velocity, b.acceleration);
// Update ball position based on velocityb.ball_circle.center.x += b.velocity.x;b.ball_circle.center.y += b.velocity.y;
As the ball moves, it will gradually accelerate downwards, simulating the effect of gravity pulling it towards the bottom of the screen.
In real-world physics, objects falling through air eventually reach terminal velocity, the maximum speed they can achieve due to air resistance. To simulate this effect, we limit the ball’s velocity to prevent it from accelerating indefinitely. The terminal velocity is calculated based on the ball’s size, and if the ball’s velocity exceeds this value, it is capped.
const double terminal_velocity_factor = 0.8;  // Adjust this factor to tune the terminal velocitydouble terminal_velocity = terminal_velocity_factor * b.ball_circle.radius;
// Cap velocity to simulate terminal velocityif (vector_magnitude(b.velocity) > terminal_velocity){    b.velocity = vector_multiply(unit_vector(b.velocity), terminal_velocity);}
By limiting the velocity in this way, we ensure that the ball falls at a realistic rate and doesn’t continue accelerating indefinitely, which could lead to unnatural behavior in the simulation.
Observing Gravity in Action with Wall Collisions
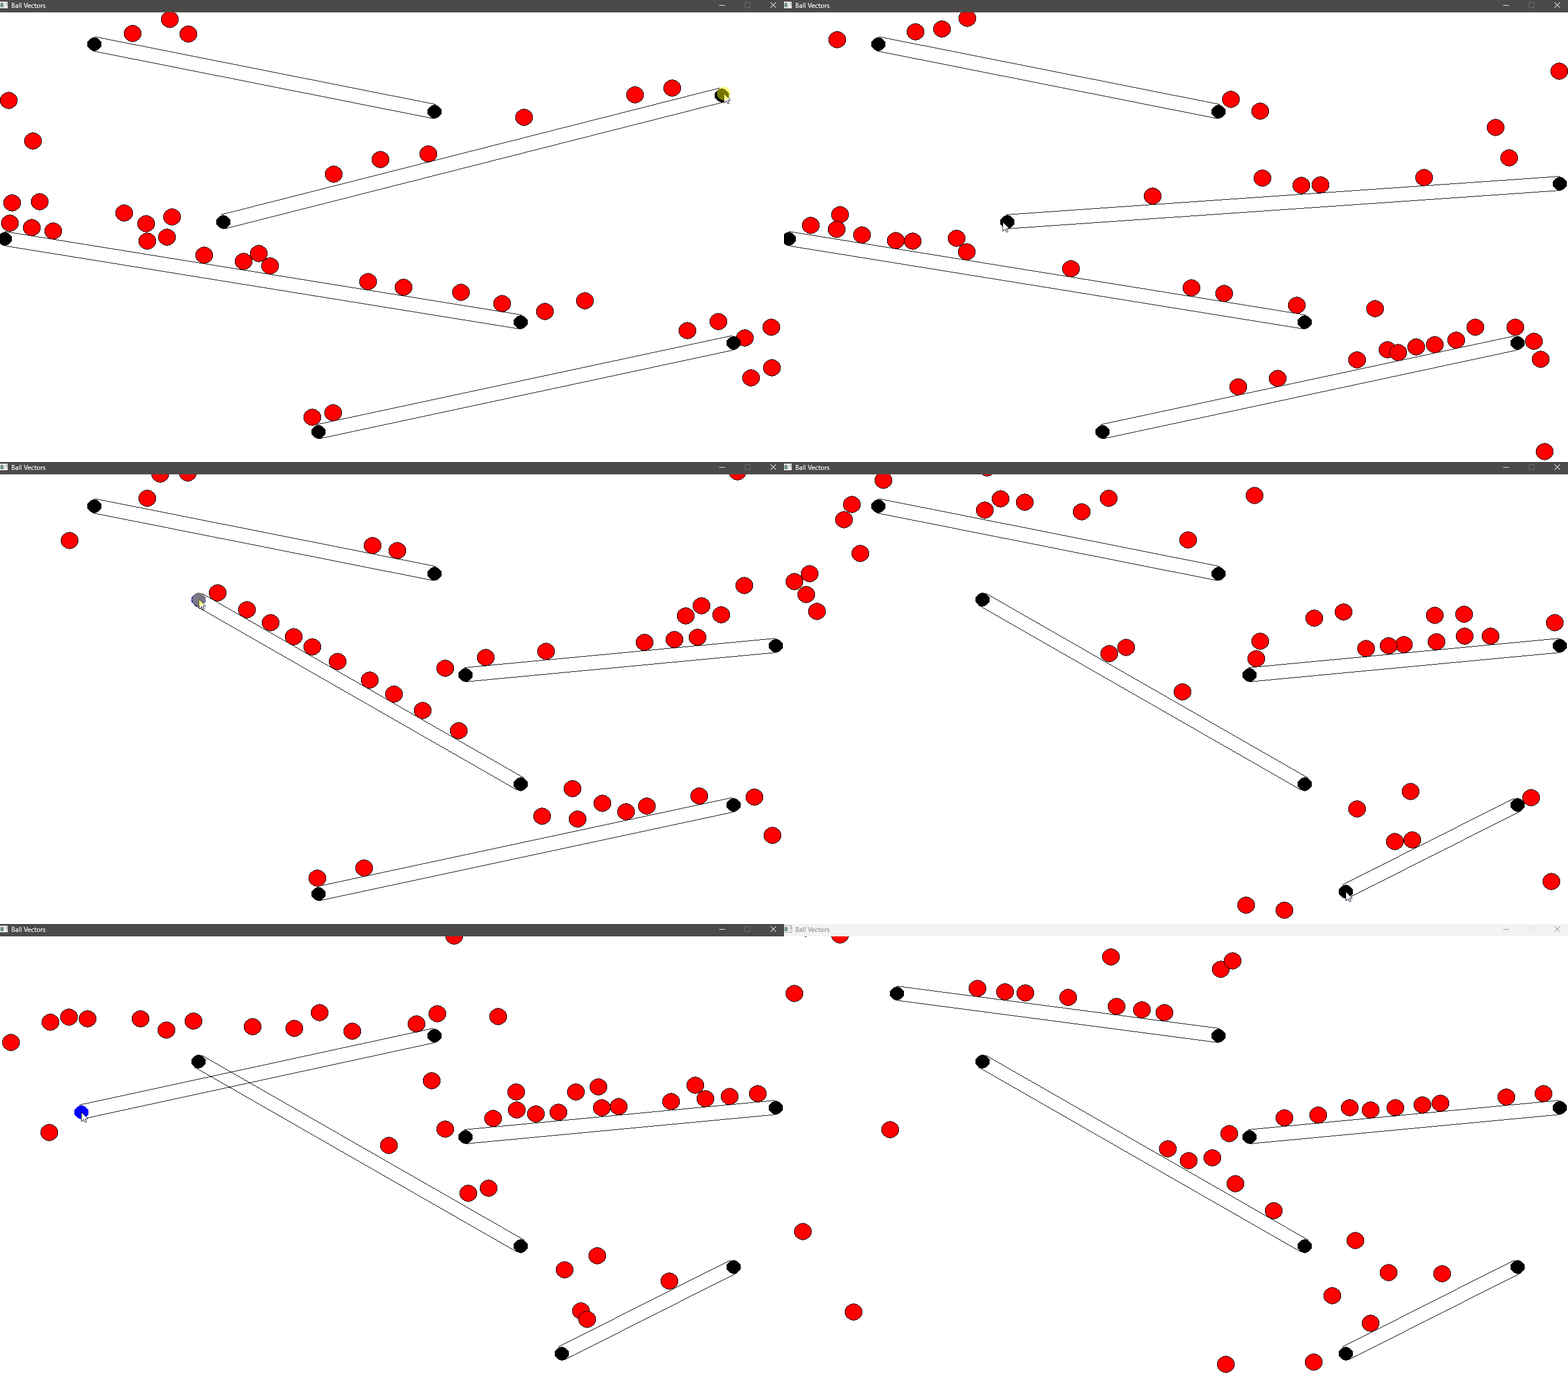
Section titled “Observing Gravity in Action with Wall Collisions”Now that we’ve implemented both gravity and wall collision detection, it’s time to see these mechanics in action. As the balls fall under the influence of gravity, you will notice how they accelerate towards the bottom of the screen. The walls in this simulation provide obstacles, causing the balls to bounce off them, adding an extra layer of complexity to their motion.
Remember:
- The balls experience a constant downward force due to gravity. Each frame, this force increases the balls’ velocity in the
ydirection, making them fall faster as time progresses. - Without any other forces acting on them, the balls would continue to accelerate, but we’ve implemented terminal velocity to limit how fast they can fall. This makes their descent appear more realistic, preventing them from speeding up indefinitely.
As the balls fall, they may collide with the walls. When this happens, the collision detection we implemented kicks in. The ball’s position is adjusted to prevent it from passing through the wall, and its velocity is reflected to simulate a bounce.
As gravity pulls the balls down, and the walls create obstacles, you’ll see the balls bounce off the walls, creating dynamic interactions. The walls disrupt the straight downward path of the balls, adding a more complex and interesting motion.
Depending on the wall’s position and angle, the balls may bounce to the left or right, which changes their trajectory. The interaction between gravity and wall collisions results in a realistic simulation where the balls follow a natural falling pattern, occasionally colliding and bouncing off walls.

Here you can see the balls falling due to gravity, accelerating until they reach terminal velocity, and bouncing off the walls. The collisions with the walls alter the balls’ direction, while gravity continues to pull them downward. Eventually, the balls may hit the bottom of the screen or bounce between walls, constantly interacting with both gravity and the obstacles in their environment.
Conclusion
Section titled “Conclusion”In this tutorial, you’ve learned how to implement realistic 2D physics in SplashKit by combining gravity and wall collision detection. These core mechanics form the basis for creating dynamic and engaging gameplay, where objects behave as if they exist in a real physical space. Understanding how to detect and resolve collisions allows you to model interactions between objects, while gravity adds an essential layer of realism by simulating the force that pulls objects downward. You can use these principles to build more advanced game elements, such as platforms, projectiles, and even full-fledged simulations. Continue experimenting with how you tune collision behavior, damping, and other forces to make your games more interactive and fun.